Revit rendering: how to render in Revit, 3 honest routes
Revit can render, and almost nobody who renders professionally uses it for that. Both halves of that sentence matter. The built-in engine produces workable images if you respect its constraints. The ecosystem around Revit produces better ones faster. The newest route skips scene preparation entirely. Here is how Revit rendering works down all 3 paths, with the honest cost of each, so you can pick by deadline instead of by habit.
Route 1: how to render in Revit with the built-in engine
The native path (View tab, then Render or Render in Cloud) runs Autodesk's local or cloud engine against your Revit model directly. No extra software, no extra license.
The workflow that produces acceptable native output:
- A camera view. View tab, 3D View, Camera. Place it at eye height, 1.6 to 1.7 m, and aim it with intent. Composition does more for the image than any render setting will.
- Materials that behave like materials. The out-of-the-box library is serviceable. The gap between an amateur native render and a decent one is mostly appearance-asset tuning: correct texture scale, some roughness variation, restrained reflectivity.
- A lighting scheme. Exterior: set a real location, date and hour in the sun settings, because generic noon light is the signature of a default render. Interior: your light fixture families need actual photometric values, and this is the point where native rendering turns into work.
- Render settings matched to the job. Draft quality while you iterate, high only for finals. A local render occupies your machine for minutes to hours. A cloud render spends credits and waits in a queue.
What native rendering honestly delivers: documentation-adjacent imagery, fine for internal review and modest client updates. What it does not deliver: the atmosphere, vegetation and entourage quality that reads as professional visualization. The material and lighting workload lands on you, inside a program whose strength is building information, not image-making.
Route 2: the ecosystem (Enscape, Twinmotion, V-Ray for Revit, Lumion)
The standard professional answer, and a good one. Real-time engines (Enscape most tightly, Twinmotion and Lumion via sync, D5 via plugin) read your Revit model live: you keep working in Revit, the engine keeps a lit, populated, walkable scene in parallel. V-Ray for Revit covers the offline craft end, for when the image itself is the deliverable.
What this route costs, stated plainly: a serious GPU, an engine license, a reasonably clean model, and the hours of scene dressing (assets, vegetation, materials beyond Revit's) that make output look professional. The learning curve is real, though shallower than full craft rendering. Ask architects what actually blocks them here and the answer comes back as hardware shorthand: VRAM, RAM, laggy models, weak laptop.
The other cost shows up later, in revisions. One architect put it this way: "We have some complicated families in a model right now and changing materials is a pain." Another, on keeping a separate visualization model alive next to the design model: "Keeping a parallel model updated in SketchUp sucks up so much additional time that smaller studios don't have." If your renders come from a second model, every design change is paid for twice.
None of that is waste. It is the price of a specific thing:
The reconstruction tax: everything you buy, learn and maintain so a render engine can rebuild reality from zero, geometry, materials, vegetation and light included, before it can show you a building you already designed.
For a practice that models in Revit daily and presents frequently, that tax pays for itself, and the full comparison lives in real time 3d rendering software. The question worth asking is narrower than "which engine": does an architect need to reconstruct at all?
Route 3: how to render in Revit from a viewport screenshot
A different prerequisite list entirely. No plugin, no GPU, no scene preparation. Screenshot your Revit view, even a white-model working view, upload it, choose style, lighting, season and environment, and get a photorealistic image back in about 30 seconds. The realism comes from a model trained on photography, so your screenshot supplies the design and the viewpoint while the model supplies materials, light and vegetation.
I build SecondRender, one of the tools on this path, so calibrate for that.
Where this route wins: speed (the Thursday-meeting problem), hardware independence, and every project stage before the model is complete enough to satisfy routes 1 and 2.
It also changes what a render is for. When an image costs seconds, you stop picking one direction and spending the budget defending it. You bring 3 versions to the meeting instead.
Render-driven exploration: treating rendering as a design tool rather than a delivery step, because once a variation costs seconds instead of days, comparing options is cheaper than committing to one.
Nobody ever chose single-option presentations. The price of a render chose them. That shift changes the client conversation more than image quality does, and it pairs directly with the feature Revit already has for the same purpose: design options in Revit.
Where it loses, stated as plainly as the rest. Generative output varies between runs: the same input does not guarantee the same output. And carrying one design, detail for detail, from one perspective into a second one is still the hardest problem in the category. Fidelity mode, which keeps your source authoritative so geometry and physical materials are preserved, and reusable styles, which transfer look and never geometry, narrow both problems considerably. They do not erase them. These are properties of AI image models generally, not bugs in one product, and you should hear that from me rather than from a deadline. BIM-integrated deliverables, live walkthroughs and pixel-final view sets belong to route 2.
One habit is worth keeping whichever AI tool you use: before an image goes to a client, compare it with the Revit view it came from. Count the openings. Check the roofline and the proportions. An architect testing AI tools on a booth design reported that "one removed an entrance and another placed furniture directly across the aisle." The image is a way to get a decision about your design, so it has to show your design. I wrote up my own tests of this problem in Nano Banana for architecture.
Picking by situation, not by loyalty
| Situation | Route |
|---|---|
| Internal design review, image quality secondary | Native (route 1) |
| Weekly client presentations from a live model, walkthroughs | Real-time (route 2) |
| Flagship marketing image | V-Ray for Revit or a studio |
| Image needed tomorrow, model incomplete, or no GPU | AI (route 3) |
| Showing 3 design alternatives photorealistically in one meeting | AI (route 3) |
| 12-view consistent final set | Route 2, or craft |
Two routes coexist happily in most practices: real-time for the model-driven phase, AI for everything earlier or faster. The one genuinely wrong answer is defaulting to native rendering for client-facing work out of habit. It is the slowest path to the least convincing image of the 3.
If the question is which tool to buy rather than which route to take, that is its own decision: rendering software for Revit.
For the full economics behind these choices: architectural rendering cost and the complete guide to architectural rendering.
Revit rendering: common questions
What is rendering in Revit? Rendering in Revit turns a 3D view of your model into a lit image with materials, either with the built-in engine on your machine, with Autodesk's cloud service, or with an outside tool that reads the model or a screenshot of it. The model stays the source. The render is a picture of it for someone who does not read drawings.
Can you render from Revit without extra software? Yes. View tab, then Render, runs the built-in engine, and Render in Cloud sends the job to Autodesk's servers. It needs no plugin. The output suits internal review more than client presentation, for the reasons in route 1.
Is there Enscape for Revit? Yes. Enscape runs as a plugin inside Revit and shows a lit, walkable version of the model while you keep working. Twinmotion, Lumion and D5 connect through a sync or a plugin. Check current pricing and licence terms with each vendor, because they change.
Can I use AI to render a Revit model? Yes, in two ways. Some AI tools run inside Revit as a plugin, and others work from a screenshot of a Revit view. In both cases the AI supplies materials, light and surroundings, and the risk to watch is the same: the image can drift from your design, so check it against the view before anyone else sees it.
From source image to a design conversation
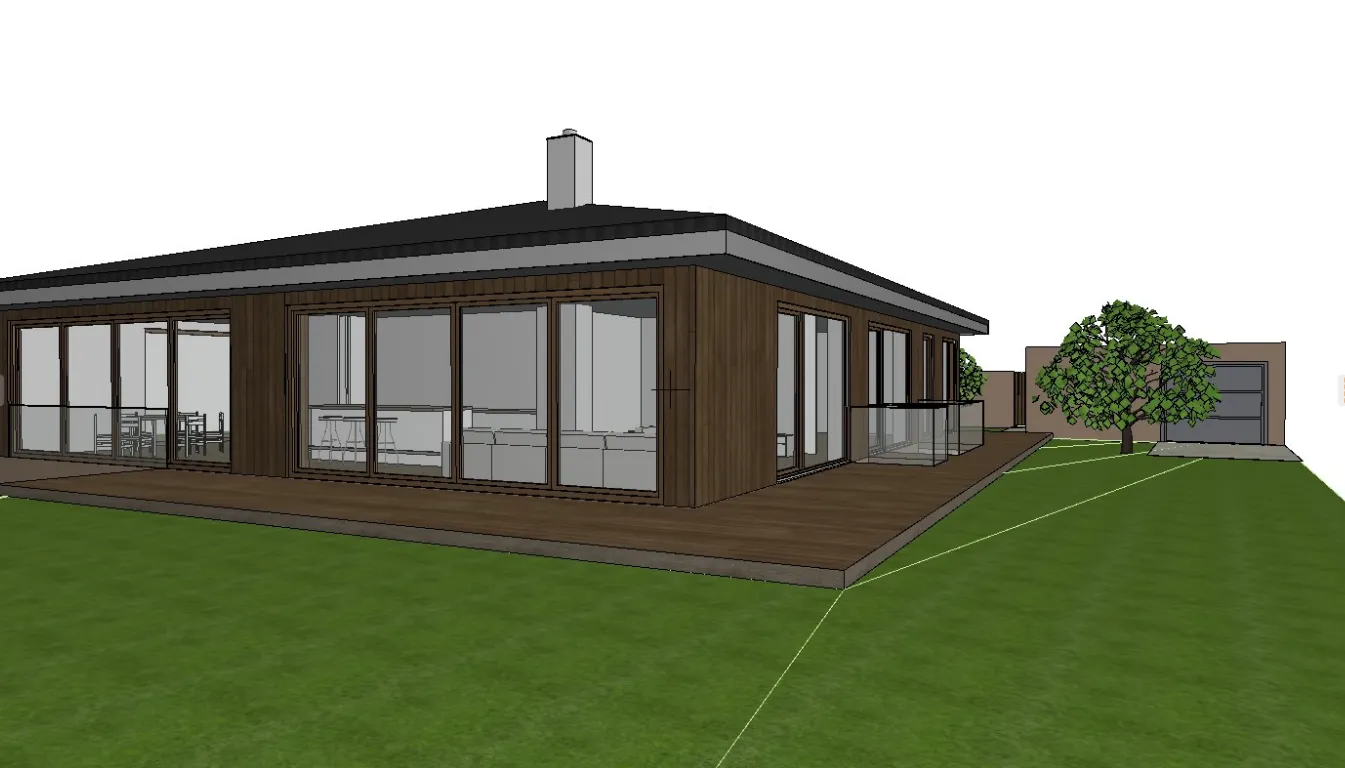
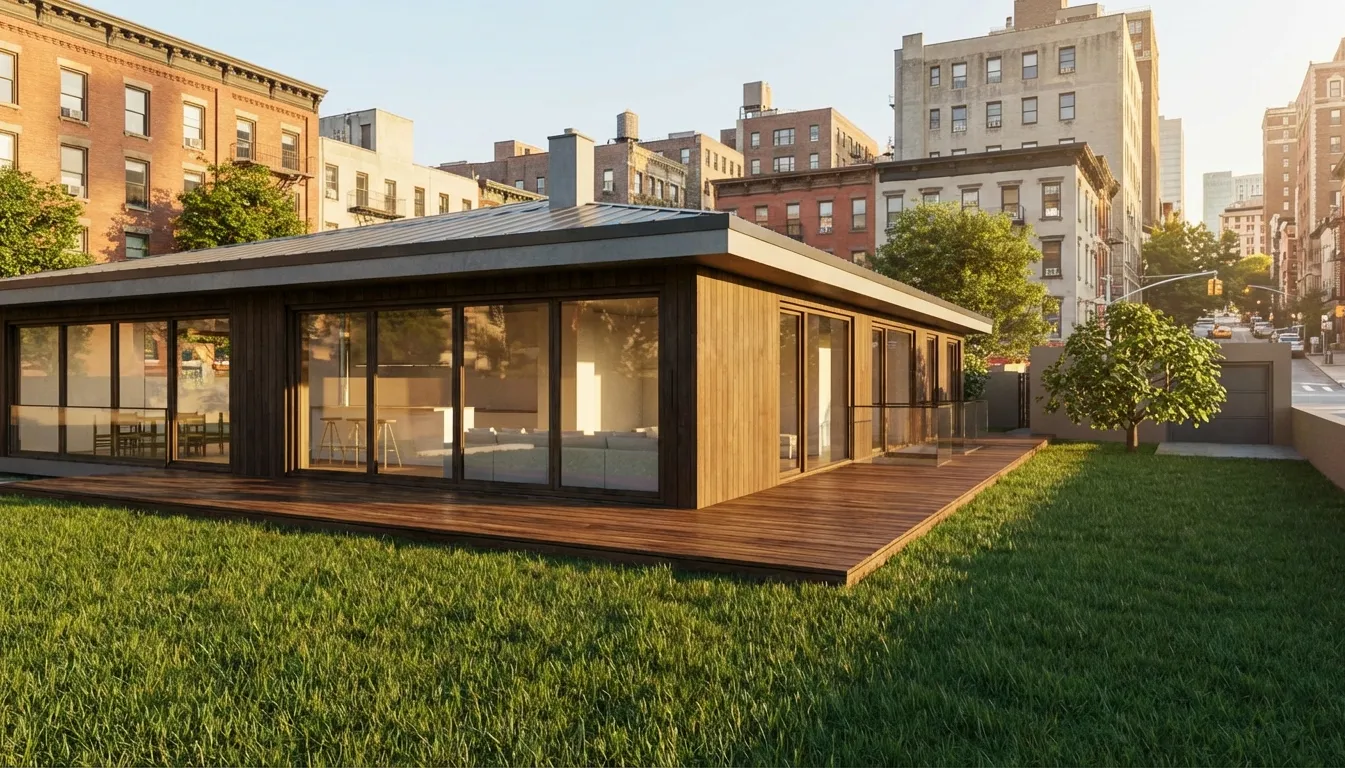
This model-view image and visualization are an existing SecondRender public example. The original authoring software is not documented, so this is an illustration of the image-based workflow, not a verified Revit project.
A practical workflow to try
- Prepare a 3D view in Revit, hide annotations that are not part of the design and export an image. This image workflow does not transfer the BIM model or its material data.
- Upload that image to SecondRender. Decide what the visualization should help you discuss: material direction, light or atmosphere.
- Write a short brief. For example: warm plaster, soft daylight, restrained planting. This is a suggested starting brief, not the recorded prompt for the example above.
- Compare the result with your source. Check rooflines, openings, floor levels, railings and surroundings. Reject or revise an image that changes something the discussion depends on.
- Show the source beside the selected result. Tell the client which parts are established design decisions and which are still visual exploration.
These examples do not include a recorded prompt, model version, settings or elapsed time. They show a visual transformation, not a benchmark or a promise of exact geometry.